List every upcoming events on one page and make each of them accessible on separate details pages
In this tutorial we will send a reference from the selected event on the list all upcoming events page as a url to a generic event details page. On the event details page we use the reference to display all details on the selected event.
The table
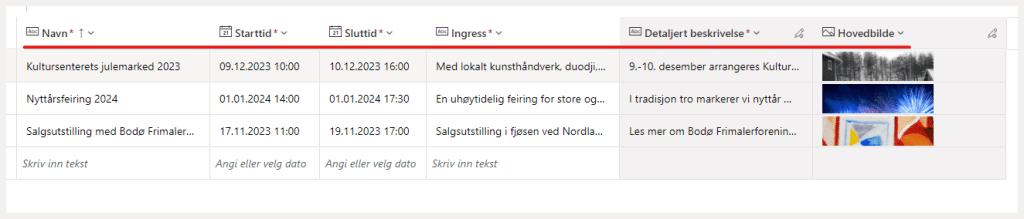
In this example we use six columns:
- Navn: For naming the event. This one only allows unique names and serves as the primary key. I know, sometimes reccurring events in fact are named the same, but we encourage to then use the year in the name as well. Two good reasons: One there should be possible to diverse the events by name for historical reasons, and second we later want to pass the name in the URL for search engine optimalization.
- Starttid: Date and time. When the event starts.
- Sluttid: Date and time. When the event ends.
- Ingress: Short description which serves as a teaser.
- Detaljert beskrivelse: Detailed description. Uses the rich editor component.
- Hovedbilde: Main image. Uses the Attachment->Image option in dataverse.
Sidenote: I use to create a CMS experience using list, forms, views and then displaying with fetchxml. I made a post on that earlier – read it here.
Displaying the all events page
Since there are several possible issues solved here we allow for taking a look at the code.
First we fetch the XML and assign it to the variable list_arrangementer.
  {% fetchxml list_arrangementer %}
    <fetch top="100">
      <entity name="cra4a_arrangementer">
        <attribute name="cra4a_detaljertbeskrivelse" />
        <attribute name="cra4a_hovedbildeid" />
        <attribute name="cra4a_ingress" />
        <attribute name="cra4a_name" />
        <attribute name="cra4a_sluttid" />
        <attribute name="cra4a_starttid" />
        <filter>
          <condition attribute="cra4a_sluttid" operator="on-or-after" value="{{ now | date: "yyyy-MM-dd" }}" />
        </filter>
        <order attribute="cra4a_starttid" />
      </entity>
    </fetch>
  {% endfetchxml %}
The filter ensures that the selected events are in the future. The order attribute then ensures that the events are listed from the next upcoming event and in ascending date order.
Now lets use the fetched xml to list the events on the page.
  <div class="row">
    {% for result in list_arrangementer.results.entities %}
    {% assign startdate = result.cra4a_starttid | date: 'yyyyMMdd' | integer %}
    {% assign stopdate = result.cra4a_sluttid | date: 'yyyyMMdd' | integer %}
    <div class="col-md-4" style="text-align: center; margin-top: 30px; padding-top: 15px;">
      <a href="arrangement?name={{ result.cra4a_name }}">
      <img src="{{ result.cra4a_hovedbilde_url }}&full=true" alt="{{ result.cra4a_name }}" />
      <h3 style="text-align: left; font-size: large; font-weight: 700">{{ result.cra4a_name }}</h3>
      </a>
    {% if startdate == stopdate %}
        <p style="text-align: left; font-size: small; font-weight: 400">{{ result.cra4a_starttid | date: "d. MMMM yyyy klokka HH.mm" }} - {{ result.cra4a_sluttid | date:"HH.mm" }}</p>
    {% else %}
        <p style="text-align: left; font-size: small; font-weight: 400">{{ result.cra4a_starttid | date: "d. MMMM" }} - {{ result.cra4a_sluttid | date: "d. MMMM yyyy" }} klokka {{ result.cra4a_starttid | date: "HH.mm" }} - {{ result.cra4a_sluttid | date:"HH.mm" }}</p>
    {% endif %}
    </div>
    {% endfor %}
  </div>
Some explanations:
    {% assign startdate = result.cra4a_starttid | date: 'yyyyMMdd' | integer %}
    {% assign stopdate = result.cra4a_sluttid | date: 'yyyyMMdd' | integer %}
We assign the startdate and stopdate to an integer type variable. We do that exluding the time in hours and minutes. The purpose is that we want a different layout / text if the event occurs on one day or if it’s a multiple day event.
{% if startdate == stopdate %}If there is a one day event this layout is chosen.
{% else %}If the event occurs over more days this layout is chosen.
<a href="arrangement?name={{ result.cra4a_name }}">- arrangement is the generic page which lists the event details.
- ?name becomes a variable which is passed with the URL for use in the page arrangement
- {{ result.cra4a_name }} passes the event name as a value of the varieble name to the arrngement page
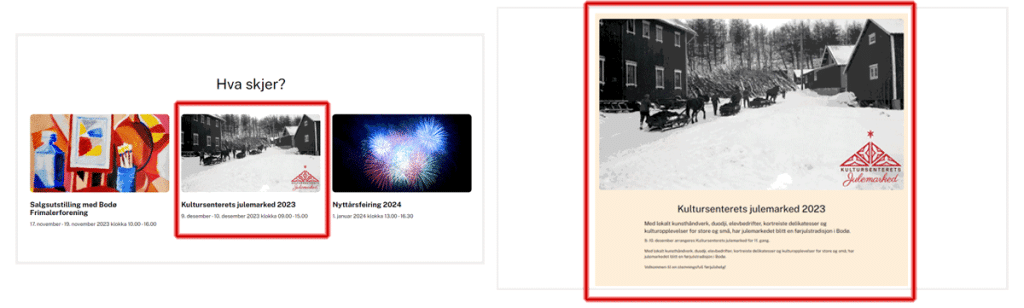
Note: Both the title on the list and the image are clickable on the all upcoming events page.
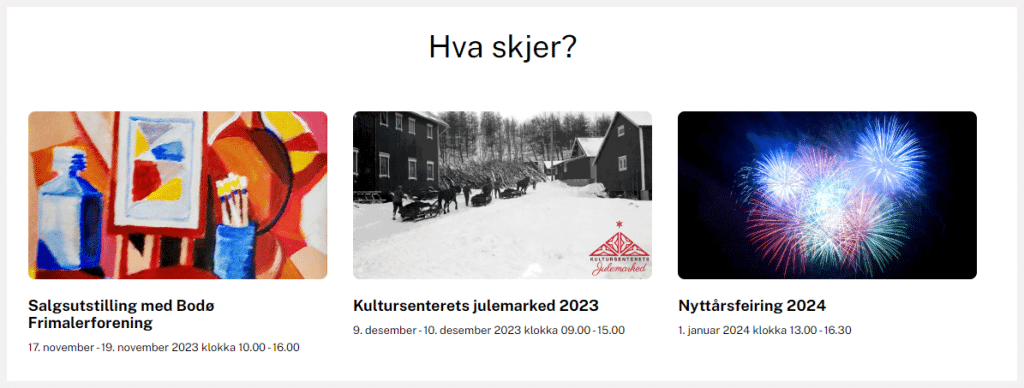
Look at the differences on the date and time layout. The last event to the right is a one day event while the two others occurs over more days.
Passing the variable: Clicking on the event Nyttårsfeiring 2024 will send us to the details page passing this URL: https://our-domain/arrangement?name=Nytt%C3%A5rsfeiring%202024
Creating and displaying the event details page
First we take care of the variable passed with the URL.
{% assign name = request.params['name'] %}We assign a new variable name and retrieve the value of the passed name variable using request.params.
Next we need to fetch the xml.
    {% fetchxml arrangementsdetaljer %}
    <fetch top="100">
      <entity name="cra4a_arrangementer">
        <attribute name="cra4a_detaljertbeskrivelse" />
        <attribute name="cra4a_hovedbildeid" />
        <attribute name="cra4a_ingress" />
        <attribute name="cra4a_name" />
        <attribute name="cra4a_sluttid" />
        <attribute name="cra4a_starttid" />
            <filter>
              <condition attribute="cra4a_name" operator="eq" value="{{ name }}" />
            </filter>
      </entity>
    </fetch>
    {% endfetchxml %}
Since we only want to display the event that compares to the sent URL variable, we go ahead filtering it out.
<filter>
              <condition attribute="cra4a_name" operator="eq" value="{{ name }}" />
            </filter>
At last we code the view.
{% for result in arrangementsdetaljer.results.entities %}
{% assign startdate = result.cra4a_starttid | date: 'yyyyMMdd' | integer %}
{% assign stopdate = result.cra4a_sluttid | date: 'yyyyMMdd' | integer %}
{% if startdate == stopdate %}
<p style="text-align: center; font-size: medium; font-weight: 600">{{ result.cra4a_starttid | date: "d. MMMM yyyy klokka HH.mm" }} - {{ result.cra4a_sluttid | date:"HH.mm" }}</p>
{% else %}
<p style="text-align: center; font-size: medium; font-weight: 600">{{ result.cra4a_starttid | date: "d. MMMM" }} - {{ result.cra4a_sluttid | date: "d. MMMM yyyy" }} klokka {{ result.cra4a_starttid | date: "HH.mm" }} - {{ result.cra4a_sluttid | date:"HH.mm" }}</p>
{% endif %}
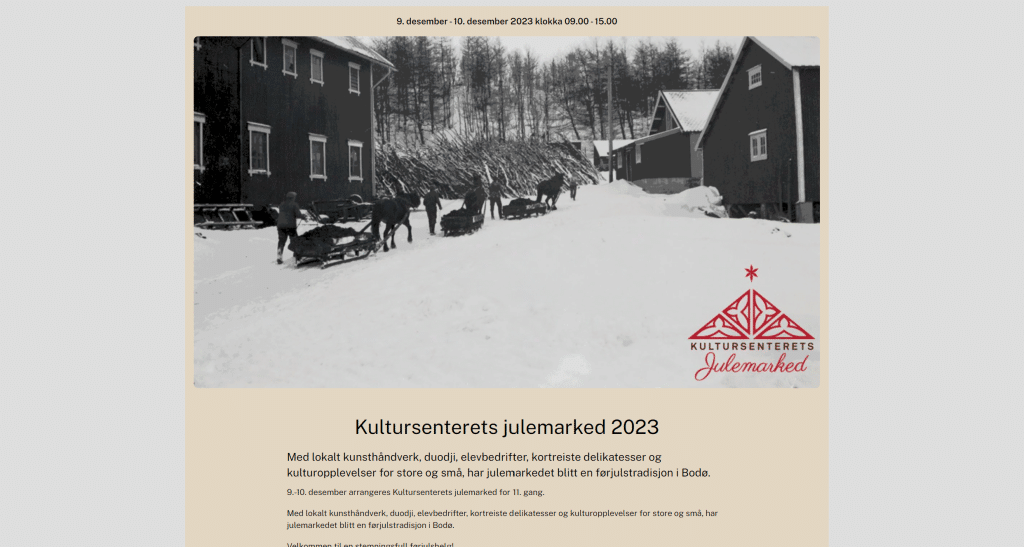
<img src="{{ result.cra4a_hovedbilde_url }}&full=true" alt="{{ result.cra4a_name }}" />
<div style="max-width: 800px; margin: auto">
<h2 style="text-align: center; margin-bottom: 20px">{{ result.cra4a_name }}</h2>
<p>{{ result.cra4a_ingress }}</p>
<p>{{ result.cra4a_detaljertbeskrivelse }}</p>
</div>
{% endfor %}Note: We again use the start and stop date trick to create different layout due to event duration.
Note 2: result.cra4a_hovedbilde_url won’t be generated by fetchxml generator in xrm toolbox. Instead I use to lookup the logical name of the column in the maker portal and add _url to it.

Now we get a nice details page for each listed event.